My Facebook friend Giulio Sciorio tagged me in a post this afternoon. To my surprise, the video below is what I found.
I think the people at Floatcam really have an interesting take on the camera/jib combination. Kessler Crane has products which offer similar functionality, but they are quite a bit bulkier and not always easy to set up on the fly.
I haven't been able to find much information about the Floatcam Dollycrane but I am willing to wager some guesses based on the above video. The rails are probably made of aluminum and look very similar to the Igus DIY sliders. The rubber wheels look a lot like the Pegasus Cable Wheels sold by Cinevate and the counter balance system reminds me of the one on the Cinevate Atlas 10, except the Atlas 10 counter balance only worked for vertical operation
(I think). The mount for the slider is pretty unique in design, but seems to function like most tripod/camera slider mounts. There's also a clip in the video that leads me to believe there will be a hand crank or motor option for this production and if not, one should be pretty easy to fashion DIY style.
I can't find an exact price for this, but Giulio heard rumors of $4500 on Cinema 5D. I'm not sure what that price will include, but it could be a really good option for someone who hasn't already invested in a slider or jib.
Thanks for sharing the video Giulio.
If anyone has any more information on this product, please drop me an email, or leave something in the comments below.
Tuesday, March 8, 2011


Saturday, February 26, 2011
Disable AGC and Monitor Audio on Your Canon T2i
While this method has been effective at reducing the noise caused by the AGC, it has also reduced the overall recording volume of the camera, which is a problem when working with soft spoken talent. When I ran into this problem, I was at a bit of a loss for a way to fix it. I emailed Deejay of DSLRfilmnoob.com, and after much thought, he suggested using a headphone amplifier to boost the volume of the mic heading into the camera, kind of like a preamp. What a genius idea!
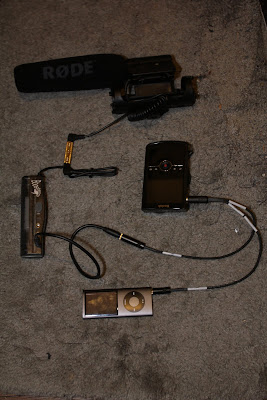
I did some searching on the interwebs, and found many different types of headphone amps, at many different prices. The Boostaroo Headphone Amp was on the cheaper side, could be found at any Radio Shack, and would output amplified audio to 3 devices. Since it had 3 output jacks, I could send one into the camera, and plug a headset into another. Below is an example of how I attached the headphone amplifier to my camera. The Kodak Zi8 stood in for my T2i since I was using it to take the photo.
To explain: the Rode Video Mic is connected to one end of a 1/8 female to 1/8 female coupler. The input of the Boostaroo Headphone Amp is plugged into the other end of the coupler. In the first output of the Boostaroo is a 1/8 male to 1/8 male audio cable which connects to the mic input of the Sescom Cable. My MP3 player is plugged into the AGC Disable end of the Sescom Cable, and this is all connected to the External Mic jack on my "T2i".
It's not shown in the above image, but you can add a pair of headphones to the Boostaroo and monitor the audio before it reaches the camera. It should be noted that the ideal place to monitor audio is when it's been passed through the camera, however, because of the constant tone played by the MP3 player to disable the AGC, you would only hear noise in your headset. If however you have a DSLR with manual audio controls, and an external monitor, check out Deejay's headphone hack.
While the Boostaroo did increase the gain of the microphone in my tests, it only increased it by 10-15db which didn't make a significant difference. The Boostaroo also lacks any type of volume control, it's either on or off, and when it's off, it decreases the recording volume and introduces a lot of noise. Finally, the Boostaroo ended up being much larger and heavier then I anticipated.
Although I will be returning the Boostaroo, it did prove proof of concept, so in it's place I have ordered the Micca Fiio e5. This unit is much smaller and lighter, has volume control, is rechargeable, has a much higher output power then the Boostaroo, is cheaper then the Boostaroo, and can often be purchased with a Y splitter like the package I linked to above. With the Y splitter you can add your headset and still be able to monitor the audio.
When the Micca Fiio e5 shows up I'll put together a video showing how I set it all up, and I'll include some tests.
Friday, January 7, 2011
More Time Lapse Tests
Happy Belated Holidays, and I hope the New Year is off to a good start for everyone. It's been a while since my last post, but I've had a lot of little projects in the works, and now they will start trickling in to the blog.
Today I want to continue discussing time lapse photography. To be honest, I'm still a bit mystified by time lapse, and based on some of the experts at Timescapes.org, it's no wonder. Although there is a lot which can be learned about shooting time lapse, getting that beautiful sequence relies, in large on luck. The members of the Timescapes.org forum have some great information up, but I've decided to continue shooting more tests with my T2I.
I've been comparing the different automatic modes on the camera, to figure out their best applications. Below is a video comparing the Av mode with the Tv mode. Neither of these clips have any color correction or de-blinking applied, they are straight out of the camera.
Av Mode: So Av mode is the cameras aperture priority mode. You set the desired aperture, and the camera automatically adjusts all other settings like shutter speed. The down side to using Av mode is it can make for an inconsistent time lapse. Look at the first clip, there are some sections where the lights on the cars are nice and streaked (there was less light in the shot so a lower shutter speed was used) and some shots where you can make out distinct details on the cars (there was a lot of light in the shot, so a faster shutter speed was used). The advantage to Av mode is it's ability to define your depth of field. If you were to shoot a time lapse of the sky, this is less of an issue since your lens will be focused to infinity, but if you have objects in the foreground and background, you will want to lock your aperture, otherwise you will see the focus change from shot to shot.
Tv Mode: Tv mode allows you to set the shutter speed, and automatically adjust the other elements, such as aperture to properly expose each shot. The plus to Tv mode is it allows you to have consist ant motion capture from shot to shot. Look at the second clip, the cars passing by the church all have that beautiful streaked look, except for the ones which got stuck at the light. Tv mode in my mind captures the essence of time lapse by allowing you to control how motion will be perceived in your final video. The down side to Tv mode is the automatic changing of aperture. If your lens isn't set to infinite, you will see the focus and depth of field shift between shots, which is really annoying. However, I've had no complaints shooting extremely wide shots, or sky shots in Tv mode.
Comparison and Other Thoughts: In comparing the two different modes in the above video, the blinking seems much more apparent in when using Av Mode. Although it's possible that nights conditions contributed to the blinking, the two streets had similar lighting and traffic flow. Although you can still notice the blinking in the street lights in the Tv mode clip, it's much more subtle.
Tv mode has become one of my favorite auto settings when shooting at an infinite focus point. Av mode would be useful if I were keeping one particular object in focus through out a time lapse, but I'm just not crazy about the change in motion captures. I find it distracting to see images go from streaky to clearly defined. However, which mode you use will depend on the effect your looking for and the circumstances under which your shooting.
Today I want to continue discussing time lapse photography. To be honest, I'm still a bit mystified by time lapse, and based on some of the experts at Timescapes.org, it's no wonder. Although there is a lot which can be learned about shooting time lapse, getting that beautiful sequence relies, in large on luck. The members of the Timescapes.org forum have some great information up, but I've decided to continue shooting more tests with my T2I.
I've been comparing the different automatic modes on the camera, to figure out their best applications. Below is a video comparing the Av mode with the Tv mode. Neither of these clips have any color correction or de-blinking applied, they are straight out of the camera.
Av Mode: So Av mode is the cameras aperture priority mode. You set the desired aperture, and the camera automatically adjusts all other settings like shutter speed. The down side to using Av mode is it can make for an inconsistent time lapse. Look at the first clip, there are some sections where the lights on the cars are nice and streaked (there was less light in the shot so a lower shutter speed was used) and some shots where you can make out distinct details on the cars (there was a lot of light in the shot, so a faster shutter speed was used). The advantage to Av mode is it's ability to define your depth of field. If you were to shoot a time lapse of the sky, this is less of an issue since your lens will be focused to infinity, but if you have objects in the foreground and background, you will want to lock your aperture, otherwise you will see the focus change from shot to shot.
Tv Mode: Tv mode allows you to set the shutter speed, and automatically adjust the other elements, such as aperture to properly expose each shot. The plus to Tv mode is it allows you to have consist ant motion capture from shot to shot. Look at the second clip, the cars passing by the church all have that beautiful streaked look, except for the ones which got stuck at the light. Tv mode in my mind captures the essence of time lapse by allowing you to control how motion will be perceived in your final video. The down side to Tv mode is the automatic changing of aperture. If your lens isn't set to infinite, you will see the focus and depth of field shift between shots, which is really annoying. However, I've had no complaints shooting extremely wide shots, or sky shots in Tv mode.
Comparison and Other Thoughts: In comparing the two different modes in the above video, the blinking seems much more apparent in when using Av Mode. Although it's possible that nights conditions contributed to the blinking, the two streets had similar lighting and traffic flow. Although you can still notice the blinking in the street lights in the Tv mode clip, it's much more subtle.
Tv mode has become one of my favorite auto settings when shooting at an infinite focus point. Av mode would be useful if I were keeping one particular object in focus through out a time lapse, but I'm just not crazy about the change in motion captures. I find it distracting to see images go from streaky to clearly defined. However, which mode you use will depend on the effect your looking for and the circumstances under which your shooting.
Tuesday, November 9, 2010
PBS' Circus Documentary
About two years ago, I picked up a part time gig working as a Logger for Show Of Force; a small production company who exceled in making award winning documentaries. The project I was working on has now been release. Circus follows the life of the performers and crew of the Big Apple Circus for a season as they tour the East Coast.
I realize this post is a little late, as the show primered on November 3rd, but have no fear, you can catch up on what you missed by checking out video clips of Circus on PBS' website. The next episode is on November 10th (tomorrow) and I'm really excited to see what this episode has in store.
Working as a logger can be a little boring, especially on a documentary. There are literally thousands of hours of footage which need to be viewed, broken up, and carefully labeled in order for the editors to be able to find footage easily. Some of the footage is great, but some is repetative. I can't even remember how many times I've seen the Big Top tent being put together. However, there are some good things about logging.
1.) you get to see all of the behind the scenes footage which may not even make it to the special features section on a DVD.
2.) you get to try and figure out which story the final show will follow.
and the Bonus benefit:
3.) You know the back story behind what's happening in the show, and you can share it with your friends and family. It's a dorky bonus, but it's fun.
I realize this post is a little late, as the show primered on November 3rd, but have no fear, you can catch up on what you missed by checking out video clips of Circus on PBS' website. The next episode is on November 10th (tomorrow) and I'm really excited to see what this episode has in store.
Working as a logger can be a little boring, especially on a documentary. There are literally thousands of hours of footage which need to be viewed, broken up, and carefully labeled in order for the editors to be able to find footage easily. Some of the footage is great, but some is repetative. I can't even remember how many times I've seen the Big Top tent being put together. However, there are some good things about logging.
1.) you get to see all of the behind the scenes footage which may not even make it to the special features section on a DVD.
2.) you get to try and figure out which story the final show will follow.
and the Bonus benefit:
3.) You know the back story behind what's happening in the show, and you can share it with your friends and family. It's a dorky bonus, but it's fun.
Thursday, October 28, 2010
DIY Shoulder Rig For $80 and Hoodman Loupe Modification Tutorial
Recently, IndieBudgetMovie left a very nice comment on my youtube video illustrating how to modify a Hoodman Loupe using a Delkin Pop-Up Shade so it can be attached directly to the LCD on your DSLR. If you haven't seen my Hoodman Modification Tutorial, and aren't happy with your LCD view finder and how it attaches, check out the tutorial above.
In any case, it turns out IndiBudgetMovie is a master of DIY as well, and put together this awesome video showing off an adjustable shoulder rig he made for $80 using a drywall square. What's great about this build is that it can easily be adjusted to fit many different types of shooters and styles. I've seen a lot of shoulder stabilizers built from PVC, which works well, unfortunately, once all the parts are connected, it can't be easily adjusted. This rig looks very solid, and not to difficult to build.
Combined with the Modified Hoodman Loupe, this will look like a pretty professional rig, and will be very functional. IndieBudgetMovie says he's going to try out my modification, so maybe he'll put together a follow up video. I'd be excited to see someone else using the modded Hoodman Loupe.
To date, this makes two people I know of who have used my tutorial to ditch the rubberbands, and secure their view finders in a better way.
I'm glad to see other people benefitting from it. After all, that's why I made the video in the first place.
In any case, it turns out IndiBudgetMovie is a master of DIY as well, and put together this awesome video showing off an adjustable shoulder rig he made for $80 using a drywall square. What's great about this build is that it can easily be adjusted to fit many different types of shooters and styles. I've seen a lot of shoulder stabilizers built from PVC, which works well, unfortunately, once all the parts are connected, it can't be easily adjusted. This rig looks very solid, and not to difficult to build.
Combined with the Modified Hoodman Loupe, this will look like a pretty professional rig, and will be very functional. IndieBudgetMovie says he's going to try out my modification, so maybe he'll put together a follow up video. I'd be excited to see someone else using the modded Hoodman Loupe.
To date, this makes two people I know of who have used my tutorial to ditch the rubberbands, and secure their view finders in a better way.
I'm glad to see other people benefitting from it. After all, that's why I made the video in the first place.
Tuesday, October 19, 2010
Figuring Out Time Lapse Photography
Inspired by Philip Bloom, and many other renowned DSLR cinematographers, I decided to purchase and intervalometer, and give Time Lapse photography a shot. Using the affordable and simple to use, Aputure Intervalometer, I've run a few time lapses to try and figure out the best camera settings. Here are the results so far.
This first time lapse was recorded looking out over the Hudson River from Northern New Jersey. I used my Canon Rebel T2i, set to AV mode (Aperture Priority) with the intervalometer set to capture a 2 second exposure every 1 second. Because it was simply a test, and I am impatient, I only left the camera running for about 30 minutes. You can see me jumping through the frame checking the camera, as I wasn't really sure what I was doing. For a first time lapse, it didn't come out too bad. You'll have to excuse the quality, as I just uploaded the Quick Time videos for the sake of this blog posting. Once I get the hang of it, I'll post a proper video.
This Time Lapse was recorded from my window in Greenwhich Village. Again, I set the T2i to AV mode, and the Intervalometer to take a 2 second exposure every 1 second. However, because it was a night time shot, the camera automatically changed the exposure speed to compensate, so in reality, it was closer to a 4 or 5 second exposure per picture. The flickering green light is the faulty street light outside my window, and not an effect of the time lapse. Neither of the above videos were color corrected or edited in any way.
I definitely need some more practice, but here are my thoughts so far.
- Knowing your math is important. How long you leave the camera snapping photos will depend on how long you want the final time lapse to be. Here's a quick example. If you want a 10 second time lapse, at 24 frames per second you will need to take 240 pictures. If the exposure of each picture is 2 seconds, you will need to wait 480 seconds, or 8 minutes. Doing the math will help you use your time more effectively.
- Different exposure times give different effects. Short exposure times seem to give a more choppy look to the footage, where as longer exposures give a smoother dream like look. Then again, this will also vary based on what your shooting. If an object is moving quickly, a fast exposure may be the only way to capture it.
- AV mode has it's ups and downs. Currently, AV mode is the best way to control photo exposure on the Canon DSLRs. It's only draw back would seem to be that it will automatically change your exposure time, despite what you set your intervalometer to. This means calculations discussed above may be useless as exposure times may change mid shoot. That being said, AV mode readjusting shutter speeds will most likely save a time lapse from being ruined by an overly dark, or overly light photo in the sequence.
- Practice and Patience are key. Philip Bloom makes time lapses look easy, but in reality, there seems to be a lot of luck in making them look good. With enough patience and practice, you should begin to understand how to get consistently good shoots, but because lighting conditions are always subject to change over time, it's a bit of a coin toss.
Wednesday, October 6, 2010
How to Run a Dual System Film Shoot
I was recently asked to edit footage filmed using a dual system setup (video and audio recorded to two seperate devices). Recording audio seperately from video is one of the best ways to increase production value, but only if it is done properly. Based on the material I was asked to edit, I realized some people may know what is needed for dual system recording, but don't know what steps to take for their efforts to be effective. With that in mind, here is a quick guide on how to run a dual system shoot. Getting the best quality is a discussion best left for another post, this is simply a Dual System Recording for Dummies Guide if you will.
The most important thing to remember when using dual systems is that you need to record a visual AND audio cue in order to sync audio and video in post production. We've all seen behind the scenes footage were a crew member calls out the scene and take number, and proceeds to slam the gate on the clapper. This way the editor has visual data to connect to audio data. In the footage I was given, a clapper was clearly labeled, and used properly, only no one on set called out the scene or take number, meaning the audio files have no discernable information. They only have a clap, and the line reading, making it nearly impossible to match them to the video.
Another key step is making sure your camera and audio recorders, are recording audio at the same bit rates. If your camera records audio at 44.1bits, and your audio recorder records at 48bits, you will get what is called drifting in post production. Drifting is when your audio and video are in sync at the beginning of a take and drift out of sync by the end of it. this is because your audio and video are playing back at two different rates. The numbers above were just examples, as these numbers will vary based on the equipment your using. For more information, refer to the owners manual for your gear.
These are essential steps to follow. If they are ignored, you could have the best quality audio and video imaginable, but they will be nearly useless, as syncing them up in post production will be near impossible.
The most important thing to remember when using dual systems is that you need to record a visual AND audio cue in order to sync audio and video in post production. We've all seen behind the scenes footage were a crew member calls out the scene and take number, and proceeds to slam the gate on the clapper. This way the editor has visual data to connect to audio data. In the footage I was given, a clapper was clearly labeled, and used properly, only no one on set called out the scene or take number, meaning the audio files have no discernable information. They only have a clap, and the line reading, making it nearly impossible to match them to the video.
Another key step is making sure your camera and audio recorders, are recording audio at the same bit rates. If your camera records audio at 44.1bits, and your audio recorder records at 48bits, you will get what is called drifting in post production. Drifting is when your audio and video are in sync at the beginning of a take and drift out of sync by the end of it. this is because your audio and video are playing back at two different rates. The numbers above were just examples, as these numbers will vary based on the equipment your using. For more information, refer to the owners manual for your gear.
These are essential steps to follow. If they are ignored, you could have the best quality audio and video imaginable, but they will be nearly useless, as syncing them up in post production will be near impossible.
Subscribe to:
Posts (Atom)


 Posts
Posts

