About two years ago, I picked up a part time gig working as a Logger for Show Of Force; a small production company who exceled in making award winning documentaries. The project I was working on has now been release. Circus follows the life of the performers and crew of the Big Apple Circus for a season as they tour the East Coast.
I realize this post is a little late, as the show primered on November 3rd, but have no fear, you can catch up on what you missed by checking out video clips of Circus on PBS' website. The next episode is on November 10th (tomorrow) and I'm really excited to see what this episode has in store.
Working as a logger can be a little boring, especially on a documentary. There are literally thousands of hours of footage which need to be viewed, broken up, and carefully labeled in order for the editors to be able to find footage easily. Some of the footage is great, but some is repetative. I can't even remember how many times I've seen the Big Top tent being put together. However, there are some good things about logging.
1.) you get to see all of the behind the scenes footage which may not even make it to the special features section on a DVD.
2.) you get to try and figure out which story the final show will follow.
and the Bonus benefit:
3.) You know the back story behind what's happening in the show, and you can share it with your friends and family. It's a dorky bonus, but it's fun.
Showing posts with label DP. Show all posts
Showing posts with label DP. Show all posts
Tuesday, November 9, 2010
Thursday, October 28, 2010
DIY Shoulder Rig For $80 and Hoodman Loupe Modification Tutorial
Recently, IndieBudgetMovie left a very nice comment on my youtube video illustrating how to modify a Hoodman Loupe using a Delkin Pop-Up Shade so it can be attached directly to the LCD on your DSLR. If you haven't seen my Hoodman Modification Tutorial, and aren't happy with your LCD view finder and how it attaches, check out the tutorial above.
In any case, it turns out IndiBudgetMovie is a master of DIY as well, and put together this awesome video showing off an adjustable shoulder rig he made for $80 using a drywall square. What's great about this build is that it can easily be adjusted to fit many different types of shooters and styles. I've seen a lot of shoulder stabilizers built from PVC, which works well, unfortunately, once all the parts are connected, it can't be easily adjusted. This rig looks very solid, and not to difficult to build.
Combined with the Modified Hoodman Loupe, this will look like a pretty professional rig, and will be very functional. IndieBudgetMovie says he's going to try out my modification, so maybe he'll put together a follow up video. I'd be excited to see someone else using the modded Hoodman Loupe.
To date, this makes two people I know of who have used my tutorial to ditch the rubberbands, and secure their view finders in a better way.
I'm glad to see other people benefitting from it. After all, that's why I made the video in the first place.
Wednesday, October 6, 2010
How to Run a Dual System Film Shoot
I was recently asked to edit footage filmed using a dual system setup (video and audio recorded to two seperate devices). Recording audio seperately from video is one of the best ways to increase production value, but only if it is done properly. Based on the material I was asked to edit, I realized some people may know what is needed for dual system recording, but don't know what steps to take for their efforts to be effective. With that in mind, here is a quick guide on how to run a dual system shoot. Getting the best quality is a discussion best left for another post, this is simply a Dual System Recording for Dummies Guide if you will.
The most important thing to remember when using dual systems is that you need to record a visual AND audio cue in order to sync audio and video in post production. We've all seen behind the scenes footage were a crew member calls out the scene and take number, and proceeds to slam the gate on the clapper. This way the editor has visual data to connect to audio data. In the footage I was given, a clapper was clearly labeled, and used properly, only no one on set called out the scene or take number, meaning the audio files have no discernable information. They only have a clap, and the line reading, making it nearly impossible to match them to the video.
Another key step is making sure your camera and audio recorders, are recording audio at the same bit rates. If your camera records audio at 44.1bits, and your audio recorder records at 48bits, you will get what is called drifting in post production. Drifting is when your audio and video are in sync at the beginning of a take and drift out of sync by the end of it. this is because your audio and video are playing back at two different rates. The numbers above were just examples, as these numbers will vary based on the equipment your using. For more information, refer to the owners manual for your gear.
These are essential steps to follow. If they are ignored, you could have the best quality audio and video imaginable, but they will be nearly useless, as syncing them up in post production will be near impossible.
Monday, September 20, 2010
Filming Tempt'd at Fashion's Night Out 2010
Here is the video I filmed and edited for www.Temptd.com, a New York based fashion blog. This was shot using a Canon T2i, a Sigma 18-50mm f2.8-5.6 lens, a Z-96 LED light and a Rode Videomic. Post Production was done in Final Cut Pro. The titles and lower thirds graphics will vary between my version of the video (above) and the one that appears on Temptd.com as the graphics were changed to match the esthetics of their previous videos.
To celebrate their 1 year birthday, Temptd.com's Founder and Editor-In-Chief, Roselyn made her way through Fashion's Night Out in New York. During the night, Roselyn updated her Twitter and Facebook with clues to her location. Readers who followed the clues and found her, were rewarded with an array of prizes.
The night was perfect for filming, and the locations were less then dull, buzzing with fashionistas, ranging from laughable fashion duds, to the world renowned fashion gods. As the cinematographer, it was difficult to get steady shots due to excited patrons scrambling for swag and free cocktails, but on the upside, there wasn't a boring place to point the camera the whole night.
As a life long student, I look to learn from every project I work on, and Fashion's Night Out is no exception. Here are some thoughts on the evening's shoot.
1.) The HDV- Z96 LED Camera Light is an indispensable piece of equipment. A huge thanks to Emm at Cheesycam for discovering this powerful production tool. Without this light, it would have been nearly impossible to capture noise-free footage given the lighting conditions in the various locations we filmed in. Furthermore, using a camera light instantly bumps up production value. If used properly, it gives a polished, pro look to footage that otherwise would look like it was shot on a camera phone. Being able to dim the light allows you to use it both indoors and out, and I even used it in place of a flash.
2.) The Rode Videomic captured audio in noisy environments extremely well. In fact, the mic is so sensitive I had to knock down the sensitivity by 10db to keep it from clipping the audio. From about 7 feet away, on a busy NYC street, I figured the camera's AGC would keep the audio from over modulating. NOPE! This mic is a blessing for DSLR filmmakers, and the high pass filter works very nicely.
3.) Less is more. With the venues being jammed with patrons, it's difficult enough to walk around without a gear bag, so you can imagine what it's like carrying the bag, and trying to operate the camera. I brought my full gear bag as I wasn't sure what the night would call for. However, I only used the 18-50mm lens, the mic, and the video light. Although I would have liked to use other lenses, the locations were too crowded, and the shoot to fast-pace to swap out glass. That being said, the Sigma lens performed very well, and I'm considering getting their 18-200mm lens for future events. The larger focal range would come in handy.
4.) Producers make life easier. When on a shoot, the talent and the cinematographer (me) are usually too focused on other things to make decisions about what needs to be shot to effectively tell the story. That's where a producer comes in. They help keep the production moving forward, and in many situations make sure enough of the right stuff is filmed to tell the desired story. We did just fine without a producer, but having one, would have made the night easier for Roselyn and I, as we wouldn't have had to keep "changing hats" throughout the night.
5.) Shuttering down the lens would have been a good idea. Although I love the look of Bokeh and a shallow depth of field, it is very difficult to keep focus while moving through a crowd at faster f-stops. It's hard to stop down the lens due to on sight lighting, but the Z-96 light provides ample light in most situations.
6.) I love my camera. The Canon T2i continues to serve me well. It performs wonderfully in low light, and makes some beautiful pieces of film. Sure, I'd like a 5D mark II, but I wouldn't trade the T2i for anything. It's small, light weight, and for the price, you can't find anything better at the moment.
After only a year, Tempt'd has a loyal fan base , but is hoping the incorporation of video with their written posts will invite in even more of an audience. We've yet to schedule our next shoot, but you can expect to see more videos like this in the future.
Tuesday, September 7, 2010
Fashion Week and Up Coming Events
The past few weeks have been quite busy for me. I've been helping Andrew Bellware on the set of his new film Earthkiller by filling in as a Gaffer, running production audio, playing a zombie, constructing sets and just about anything else that needed to be done during the course of a day's shoot. It's been a lot of fun.
I offered to replace the photographer my Father's company usually uses to photograph art work for appraisals, but it's been such a legistical nightmare, I haven't had a chance to shoot yet. I think we've finally hammered down a schedule, and I should start shooting later this week. I'm looking forward to shooting some stills with the T2i. I shot some pictures of the sunset last week, and they came out great, so I have little doubt in the camera's ability to shoot great pictures.
It looks like I've landed a paid gig filming an event during fashion week. I found a highschool friend on Facebook, and it turns out she has built a rather successful fashion blog, and was interested in including some videos to compliment the print media in her posts. The details are vague at this point, but more information will follow shortly. It looks like the first shoot will be this Friday.
Thursday, August 26, 2010
The Canon 60D Has Been Announced!

Canon recently posted this press release announcing the Canon 60D. For those DSLR film makers who already own a Rebel T2i/550D or better, this isn't too ground breaking, but for those who have yet to purchase a DSLR for it's video features, this is great news.
The 60D is replacing the older 50D, and as far as specs and features, sits in the middle of the T2i and the 7D. The above press release gives a full break down of the camera's features, but here are a few that make this camera a great buy for the new DSLR film maker
- 3 inch articulated rear LCD screen (great for low angle or high angle shots)
- Manual Audio Controls (not during video recording, but you can preset before shooting)
- Manual Exposure Controls (incremented in 64 steps like the latest firmware update for the 5D)
- The ability to trim video clips in camera (saves time in post production)
For those shooting stills as well as video, the camera boasts 5.3 shutter cycles per second (faster then the T2i but slower then the 7D) and the ability to process RAW files in camera, among many other features.
For T2i and 7D owners; the internals of the 60D aren't much more advanced then the cameras you own, so I wouldn't run out and place and order. The articulated screen and manual audio are nice, but by now, you've probably purchased an external monitor and Zoom H4N for audio. I would start saving some money, because I think it will be a short time before Canon releases a camera able to shoot in RAW, or a full frame camera with all of the erganomic features the 60D is flaunting.
If you've yet to purchase a DSLR, and are working on a tight budget, this is a great camera for you. The addition of the articulated screen and manual audio control alone will save you money on accessories. Combined with the other features, this is a powerful camera, great for the aspiring DSLR film maker.
Tuesday, August 17, 2010
IndiSystem's UlTRAcompact: Product Review

When I was researching different shoulder rigs to mount my Canon Rebel T2i, I came across the Ultra Compact Shoulder rig, produced by IndiSystem. I however couldn't find any reviews on the product, so I thought this might be helpful to many people.
Preface: When I review products on my blog, the opinions provided are souly mine, and not influenced by any affiliations with companies or individuals. I will not endorse a product which I would not personally recommend or use. Now, on to the review.
Introduction
If your in a hurry, here's the quick and dirty review: I'd really like to reccommend this product, because it is very affordable, I like to support small businesses, which IndiSystem seems to be, and the design is great on paper. However, in practice, it doesn't live up to my expectations. Although I have learned how to work around specific failings of the original design, I often find myself wishing I had saved some more money and purchased a better rig. It's possible that I received a product with defects, but based on some comments I've seen on other blogs, I think it is the quality of manufacturing overall, not my specific item.
For those interested, I will list the good and bad features of the Ultra Compact, and you can then decide for yourself if it's for you.
The Good
At $300.00, the Ultra Compact is by far one of the most affordable, and reconfigurable DSLR shoulder mounts available on the consumer market. The system includes two adjustable forward handles, an adjustable shoulder pad with mounts for counter weights, a "C" handle for mounting accessories, or doing low angle hand held shots, carbon fiber rails, a proper video plate with forward/backward adjustment for balance, and an adjustable base plate for mounting to a tripod or rasing and lowering the camera body in relation to the support rails (nice feature when using a follow focus and different sixed lenses).
The rig folds rather small, and although heavier then I expected, when in use, the weight is not noticible, and helps make for a smoother shot. The camera mounts quickly to video plate, and stays secure to the rig. There are many adjustments which can be made to make room for a follow focus or a matte box, and the camera can be easily positioned to mount and LCD viewfinder.
Once you get the rig adjusted to your body, it really makes a difference in shooting handheld footage, Minimizing a large amount of shake.
The Bad
It took nearly three weeks for me to receive my shoulder rig, as opposed to the expected one week estimated in my confirmation email. I called customer care several times before getting a hold of someone. Jim, the man I spoke to was very kind and apologetic, but I got the sense he is opporating a one man business out of his garage or work shop. I commend him for his efforts, but think he needs some help to meet the expectations of DSLR film makers.
The quick release knobs are nearly impossible to securely tighten, and the forward handles always seem to have a bit of wobble in them. I've been building bicycles for 10 years, so I'm pretty sure it's not my grip that's the issue. The inability to securely tighten these knobs means that parts of the rig shift during opperation. At times it's a bit frightening because it feels like your about to drop the entire rig.
The baseplate meant to mount to a tripod comes with the standard 1/4 20 threading, however, if you only use a single 1/4 20 screw, the rig will rock back and forth on the tripod, even if the tripod is locked down. I tried using two screws on the tripod quick release plate, but the holes on are so close together that they screw heads end up brushing against eachother and loosening up over time. Had the two 1/4 20 mounts on the rig's base plate been spread slightly further apart, this wouldn't been an issue.
The shoulder pad looks like it would be comfortable, but something is just not right. I can't put my finger on it. I think if it were a little longer, and a little wider, it would rest comfortably on your shoulder, but now, I find I'm readjusting in between shots to try and find the sweet spot.
Conclusion
The IndiSystem Ultra Compact shoulder rig proves the saying true; "you get what you pay for".
Although it is very affordable, and many of the issues can be dealt with, you will always feel the desire to have a better, more solid rig to work with. Rather then buying the Ultra Compact, it would be best to save your money and buy from a larger, more established company like Zacuto.
When you purchase from a larger company, there will be plenty of reviews and opinions to help guide your purchase, and you will have more people to help you out should you have a problem.
I really hate to give this product a bad review. Jim strikes me as a very nice person, and he has a lot of good designs, it just seems that he needs some help in the manufacturing department, as well as quality control. If this article get's back to him, or any one at IndiSystem, I hope they will use it to produce better quality products.
Furthermore, if anyone else has purchased this product or similar products from IndiSystem, please let me know about your experience with it. As I haven't seen any other reviews of their products, I can't yet be sure that this review is based on a flawed item, or if it reflects the overall quality of their product. Should I discover that I got the oddball wobbly shoulder rig, I will seek to exchange mine for a new one, and rewrite this review.
Wednesday, August 11, 2010
The Z96 LED Light- An Awesome, Affordable, Bright LED Camera Light

About a month ago I shot footage at a wedding and got to thinking it might be a good idea to invest in a camera light. I do a lot of event videography, and although my 50mm lens does well in low light, an additional light source would be useful. So I started doing some research and investigation. Last night I placed an order for the HDV-Z96 LED light.
 I stumbled upon this product while surfing the interweb, and it immediately caught my attention. At $69 (free shipping) it was significantly cheaper then any of the other lights of similar quality. It comes standard with an adjustable hot shoe mount, a warm and diffusion filter, it is dimmable, can run on either AA or popular camera batteries without using an adapter, and casts a bright white, 16x9 beam of light. Once I saw the video included in the ebay listing, I was sold. The video shows a side by side comparison of the Z96, and it's closest competitor, and there is hands down, no contest. The z96 takes the cake.
 The light was purpose built for the DSLR cinematographer on the go, and as an added feature, you can connect multiple lights together to create studio type panel lights. Check the ebay link above and you will see that the lights are being sold individual, or in a value pack of 4 units. If your planning on connecting the lights together, the 4 piece set is definitely a great purchase.
My only regret so far is not having ordered it sooner. I have to film a band tomorrow night, and sure this would have been useful to have on hand.
Once the light comes in, I'll put together a video review so you can check it out.Wednesday, August 4, 2010
Why You Should White Balance Your Camera and How to Do It!
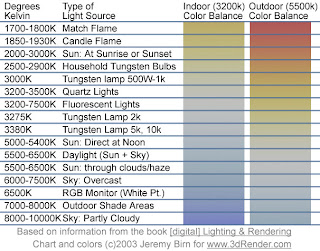
White balancing is a process meant to compensate for the unnatural color casting produced by the light source present at the moment the image is captured to your camera. Every light source produces light of a different color. The lights color is some times referred to as color temperature. For example, the Sun as it rises and sets tends to provide a golden orange light, whereas a florescent light bulb tends to be a faint yellow. Color temperature is measured in degrees Kelvin, and contrary to common sense, light of a higher temperature is more blue in color, and light of a lower temperature is more orange and red. The chart below will give you a good idea of how color temperature works.
If you forget to set your white balance before shooting, you will most likely end up with images and video tinted different colors based on the light source present. You may have heard someone say "this clip looks a little hot". This could be due to someone not setting the white balance, and the clip came out with a redish tint. If you've forgotten to set white balance, and shot a bunch of footage, don't worry, there are ways to correct it in post production, however they can some times be tricky, and almost always more time consuming then setting your white balance from jump street.
So now that you know a little a bit about white balance, lets learn how to do it. There are two ways to set white balance on most modern DSLR cameras.
- Use the presets and auto white balance (AWB) built into the camera.
- Set a custom white balance.
Using the presets and auto white balance in the camera will vary slightly between camera models, but essentially, you want to find the white balance function in the camera menu, and set the white balance to an appropriate setting for the environment your shooting in; I.E. Sun light-use outdoors, Night- Duh!, Florescent-When you hear the annoying buzzing from tubes up above and so on. For more information, refer to your cameras owners' manual. The presets work pretty well, as well as the auto white balance, but some times, the lighting can be a little tricky where your shooting, and throw the presets off. That's the beauty of custom white balance.
To use a custom white balance, you'll want to get an 18% grey card. Why not a white card? White cards easily get marked and dirty and can throw off your white balance. I got this Grey card set at B&H for $22. It's easy to pack, and includes a white and black card along with the grey card. Place the Grey card so that it is under the lights you will be shooting your subjects in. Zoom in, or step closer so the center of your view finder is filled with the grey card; focus isn't an issue for this. Snap a picture.
To set the custom white balance on the Rebel T2i, go to the camera menu, and look for "Custome White Balance". Set the custom white balance to the picture you just took. Using it's super camera computer brain, it will use that picture as a reference to adjust for any unnatural color casting. If you are changing locations, or the lighting is changing significantly in the first location, you will have to reset the custom white balance to reflect the change. Don't for get to select custom white balance as your WB mode before shooting. Again for more details, refer to your camera's manual.
Using a grey card and the custom white balance function on my T2i has saved me a lot of time and trouble in post production. Doing it properly before shooting allows me to enter the post production process with clean, clear images, so if I want to add my own tinting or effects to the shot, I can start with a clean canvas.
You may find there are times when you like the tint caused by the light source, so you turn the white balance off. That's ok too, but you may want to shoot one with WB, and one without, that way you can make a final choice later on. Experiment, and see what works best for you.
If you found this article helpful, or at the least, entertaining, drop me a comment down below. As much as I love hearing myself talk/type, I write this blog for others to benefit from my learning process. I won't know which cotent is helpful, and which content is crap unless you let me know.
Tuesday, August 3, 2010
Vests are a Great Accessory for Any DSLR Cinematographer
I don't know why it took me so long to figure this out, but a Photographers Vest is a great way to transport your gear while shooting, be it a live event or a studio type of shoot.
I usually film live events, or work alone, so I am always looking for ways to transport and access my gear when on the move. I first started out with a Canon Back Pack, which was cheap, held a lot of gear, and was comfortable to wear. The down side to the back pack was that I had to take it off, and set it down if I wanted to swap lenses, or change filters. The other problem is that it was too big to get in and out of the smaller venues I was filming in.
I now have a Nikon Camera Bag which I really like. It was relatively cheap, and with some space management I was able to fit all 4 of my lenses, the camera body, a loupe, filters, extra battery and charger, and a few other goodies into this small sholder bag. It's much smaller then the back pack, and easier to get around with, but I still have to set it down to change lenses. Almost the perfect solution, but not quite there.
It hit me the other night while watching the Matrix. All bad ass guys have vests. Neo had one, Arnold in Predator, and Commando, El Deuche in Boondock Saints; and all for the same reason, all your gear is right at your finger tips. BINGO!!!! I found this Photographers Vest, and it's perfect. Upon arriving to a location shoot, I can take whatever lenses and filters I might need, stick 'em in the vest, set the camera bag aside, and get straight to shooting. If I need to swap lenses, I just grab the lens from one of the pockets, and BAMO, lens swap has taken place.
On little day trip shoots, I won't even have to bring the bag, I can pack everything I need right into the vest. If I were working on larger projects, I would have an assistant camera person who would carry the camera bag, or be in charge of guarding it, making sure nothing is stolen. Until then, this is an inexspensive and effective way for me to manage my gear on a solo shoot.
If you have another solution to dealing with your gear as a lone shooter, send me picks of your setup, or post me a comment and tell me about it.
Wednesday, July 28, 2010
The Film Makers Cooperative- Thank You to the Frugal Filmmaker
I just wanted to give a big thanks to Scott Eggleston, author of the Frugal Filmmaker for posting a link to my Hoodman Loupe tutorial. Scott is a valuable source of information, as well as an inspiration and example for the low/no budget film maker. With a variety of DIY projects, which are full functional, multi-applicable and often costing under $10 he proves it is possible for an aspiring film maker to stop aspiring, and start film making, no matter how small the budget may be.
Scott's willingness to provide links to valuable information, even if he isn't the author, speaks to his commitment to the independent film making community. The film industry is a difficult one to be in. By freely sharing information and working together, it might not be as difficult.
"One hand washes the other".
For some great DIY projects, and valuable tips and info on film making with a small budget, I strongly recommend checking out Scotts blog.
Tuesday, July 27, 2010
Gorilla Film Making- A Must for Film Students and Aspiring Film Makers
For the past two days I have been working with a group of students on a short film for their class. I was brought on as a gaffer, but like most small shoots, I've been filling in other roles, like media management. They're a good group of people, punctual, ready to work and knowledgeable in the craft of film making. It's interesting working with college students. They are familiar with the names and applications for industry standard gear, and they run a shoot by the book. The only problem with college students is their dependency on gear, and book taught procedure.
On yesterday's shoot, we were short on C- stands, and some of the students couldn't figure out how to hang flags and scrims. Having worked on a lot of low budget gorilla shoots, I've learned how to do a lot with very little, so I grabbed some spring clamps and gaff tape. Admittedly, it's easier setting up for a shot when you have the proper gear, but at the end of the day you need to get the job done with whatever you have.
Every film course should require at least one low budget film assignment. They could call it the Film makers survival training. Groups of students would be given a camera and a tripod, and have shoot a short film with supplies they could buy at a hardware store or Duane Reade.
Working with professional gear is great, but depending on it is not. Unless you are one of the fortunate few who can transition from college into big Hollywood productions, then chances are your going to be working on indy films. No matter where you end up working, no one wants to hear "we can't get it done cause we don't have a C- stand". Everyone wants to hear "I can make it work". If you can get the job done with spring clamps, cardboard, gaff tape and clamp lights, imagine what you'll be able to do with proper gear.
Saturday, July 24, 2010
A Scandalicious Day of Indy Film Making
I spent today with sweat dripping into my eyes, baking in the ridiculous heat. However it was for a good reason. The super talented, ultra awesome, and incredible funny Jamie Scandal. I've worked with her in the past editing some footage of her one woman show American Survivor as well as some of her other live performances. So Jamie called me the other day and says
"Hey Dave, can you help me out with this video project on Saturday"
"Uh, yeah I think I can move some things around in my schedule. What's it about Jamie?"
"Well, Scott Grimes is having people make a music video for his song 'Hide'. There are no rules, but you have to lip sync as much as possible, and a pieces of every video entry will be in the final video"
"Oh, what are you thinking of doing?"
"Scott Grimes has a bromance with Russell Crowe, so I'm going to fall in love with a Russell Crowe doll as a metaphor for their bromance."
"I am so in" I reply.
So we spent the day sweating away filming in and around central park. The insane, brain frying heat aside, it was a lot of fun. Jamie is high energy, full of laughs, has no shame, and just an all around pleasure to work with. Towards the end of the day, we were both heat stroked, I don't know if we even shot what we needed, I just know that it was funny as all get out.
We used a little flip camera Jamie bought of craigslist for $40. Surprisingly the camera struggled with the brightly lit outdoor scenes. Normally, those types of cameras hold up well outdoors, and fall apart indoors. This was not the case with this camera. As the camera person, I did my best to work around it, and I think I did a fairly good job.
Let this be a lesson to all you aspiring film makers. There are two types of people in the film world. There are those that complain that they don't have the right equipment, or not enough of a budget, and hold off on making a film. Then there are those that work with what they have and are constantly making films. Even if their silly, and don't change the world, what would you rather do? Complain and not follow your passion, or give it whatever you've got, and just love the craft? You probably know my answer by now.
Here is the finished video.
Subscribe to:
Posts (Atom)


