My Facebook friend Giulio Sciorio tagged me in a post this afternoon. To my surprise, the video below is what I found.
I think the people at Floatcam really have an interesting take on the camera/jib combination. Kessler Crane has products which offer similar functionality, but they are quite a bit bulkier and not always easy to set up on the fly.
I haven't been able to find much information about the Floatcam Dollycrane but I am willing to wager some guesses based on the above video. The rails are probably made of aluminum and look very similar to the Igus DIY sliders. The rubber wheels look a lot like the Pegasus Cable Wheels sold by Cinevate and the counter balance system reminds me of the one on the Cinevate Atlas 10, except the Atlas 10 counter balance only worked for vertical operation
(I think). The mount for the slider is pretty unique in design, but seems to function like most tripod/camera slider mounts. There's also a clip in the video that leads me to believe there will be a hand crank or motor option for this production and if not, one should be pretty easy to fashion DIY style.
I can't find an exact price for this, but Giulio heard rumors of $4500 on Cinema 5D. I'm not sure what that price will include, but it could be a really good option for someone who hasn't already invested in a slider or jib.
Thanks for sharing the video Giulio.
If anyone has any more information on this product, please drop me an email, or leave something in the comments below.
Showing posts with label Photographer. Show all posts
Showing posts with label Photographer. Show all posts
Tuesday, March 8, 2011
Friday, January 7, 2011
More Time Lapse Tests
Happy Belated Holidays, and I hope the New Year is off to a good start for everyone. It's been a while since my last post, but I've had a lot of little projects in the works, and now they will start trickling in to the blog.
Today I want to continue discussing time lapse photography. To be honest, I'm still a bit mystified by time lapse, and based on some of the experts at Timescapes.org, it's no wonder. Although there is a lot which can be learned about shooting time lapse, getting that beautiful sequence relies, in large on luck. The members of the Timescapes.org forum have some great information up, but I've decided to continue shooting more tests with my T2I.
I've been comparing the different automatic modes on the camera, to figure out their best applications. Below is a video comparing the Av mode with the Tv mode. Neither of these clips have any color correction or de-blinking applied, they are straight out of the camera.
Av Mode: So Av mode is the cameras aperture priority mode. You set the desired aperture, and the camera automatically adjusts all other settings like shutter speed. The down side to using Av mode is it can make for an inconsistent time lapse. Look at the first clip, there are some sections where the lights on the cars are nice and streaked (there was less light in the shot so a lower shutter speed was used) and some shots where you can make out distinct details on the cars (there was a lot of light in the shot, so a faster shutter speed was used). The advantage to Av mode is it's ability to define your depth of field. If you were to shoot a time lapse of the sky, this is less of an issue since your lens will be focused to infinity, but if you have objects in the foreground and background, you will want to lock your aperture, otherwise you will see the focus change from shot to shot.
Tv Mode: Tv mode allows you to set the shutter speed, and automatically adjust the other elements, such as aperture to properly expose each shot. The plus to Tv mode is it allows you to have consist ant motion capture from shot to shot. Look at the second clip, the cars passing by the church all have that beautiful streaked look, except for the ones which got stuck at the light. Tv mode in my mind captures the essence of time lapse by allowing you to control how motion will be perceived in your final video. The down side to Tv mode is the automatic changing of aperture. If your lens isn't set to infinite, you will see the focus and depth of field shift between shots, which is really annoying. However, I've had no complaints shooting extremely wide shots, or sky shots in Tv mode.
Comparison and Other Thoughts: In comparing the two different modes in the above video, the blinking seems much more apparent in when using Av Mode. Although it's possible that nights conditions contributed to the blinking, the two streets had similar lighting and traffic flow. Although you can still notice the blinking in the street lights in the Tv mode clip, it's much more subtle.
Tv mode has become one of my favorite auto settings when shooting at an infinite focus point. Av mode would be useful if I were keeping one particular object in focus through out a time lapse, but I'm just not crazy about the change in motion captures. I find it distracting to see images go from streaky to clearly defined. However, which mode you use will depend on the effect your looking for and the circumstances under which your shooting.
Tuesday, November 9, 2010
PBS' Circus Documentary
About two years ago, I picked up a part time gig working as a Logger for Show Of Force; a small production company who exceled in making award winning documentaries. The project I was working on has now been release. Circus follows the life of the performers and crew of the Big Apple Circus for a season as they tour the East Coast.
I realize this post is a little late, as the show primered on November 3rd, but have no fear, you can catch up on what you missed by checking out video clips of Circus on PBS' website. The next episode is on November 10th (tomorrow) and I'm really excited to see what this episode has in store.
Working as a logger can be a little boring, especially on a documentary. There are literally thousands of hours of footage which need to be viewed, broken up, and carefully labeled in order for the editors to be able to find footage easily. Some of the footage is great, but some is repetative. I can't even remember how many times I've seen the Big Top tent being put together. However, there are some good things about logging.
1.) you get to see all of the behind the scenes footage which may not even make it to the special features section on a DVD.
2.) you get to try and figure out which story the final show will follow.
and the Bonus benefit:
3.) You know the back story behind what's happening in the show, and you can share it with your friends and family. It's a dorky bonus, but it's fun.
Thursday, October 28, 2010
DIY Shoulder Rig For $80 and Hoodman Loupe Modification Tutorial
Recently, IndieBudgetMovie left a very nice comment on my youtube video illustrating how to modify a Hoodman Loupe using a Delkin Pop-Up Shade so it can be attached directly to the LCD on your DSLR. If you haven't seen my Hoodman Modification Tutorial, and aren't happy with your LCD view finder and how it attaches, check out the tutorial above.
In any case, it turns out IndiBudgetMovie is a master of DIY as well, and put together this awesome video showing off an adjustable shoulder rig he made for $80 using a drywall square. What's great about this build is that it can easily be adjusted to fit many different types of shooters and styles. I've seen a lot of shoulder stabilizers built from PVC, which works well, unfortunately, once all the parts are connected, it can't be easily adjusted. This rig looks very solid, and not to difficult to build.
Combined with the Modified Hoodman Loupe, this will look like a pretty professional rig, and will be very functional. IndieBudgetMovie says he's going to try out my modification, so maybe he'll put together a follow up video. I'd be excited to see someone else using the modded Hoodman Loupe.
To date, this makes two people I know of who have used my tutorial to ditch the rubberbands, and secure their view finders in a better way.
I'm glad to see other people benefitting from it. After all, that's why I made the video in the first place.
Tuesday, September 7, 2010
Fashion Week and Up Coming Events
The past few weeks have been quite busy for me. I've been helping Andrew Bellware on the set of his new film Earthkiller by filling in as a Gaffer, running production audio, playing a zombie, constructing sets and just about anything else that needed to be done during the course of a day's shoot. It's been a lot of fun.
I offered to replace the photographer my Father's company usually uses to photograph art work for appraisals, but it's been such a legistical nightmare, I haven't had a chance to shoot yet. I think we've finally hammered down a schedule, and I should start shooting later this week. I'm looking forward to shooting some stills with the T2i. I shot some pictures of the sunset last week, and they came out great, so I have little doubt in the camera's ability to shoot great pictures.
It looks like I've landed a paid gig filming an event during fashion week. I found a highschool friend on Facebook, and it turns out she has built a rather successful fashion blog, and was interested in including some videos to compliment the print media in her posts. The details are vague at this point, but more information will follow shortly. It looks like the first shoot will be this Friday.
Wednesday, August 4, 2010
Why You Should White Balance Your Camera and How to Do It!
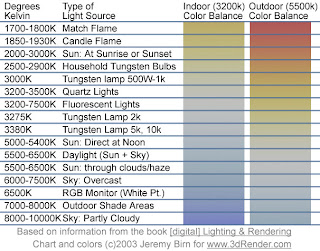
White balancing is a process meant to compensate for the unnatural color casting produced by the light source present at the moment the image is captured to your camera. Every light source produces light of a different color. The lights color is some times referred to as color temperature. For example, the Sun as it rises and sets tends to provide a golden orange light, whereas a florescent light bulb tends to be a faint yellow. Color temperature is measured in degrees Kelvin, and contrary to common sense, light of a higher temperature is more blue in color, and light of a lower temperature is more orange and red. The chart below will give you a good idea of how color temperature works.
If you forget to set your white balance before shooting, you will most likely end up with images and video tinted different colors based on the light source present. You may have heard someone say "this clip looks a little hot". This could be due to someone not setting the white balance, and the clip came out with a redish tint. If you've forgotten to set white balance, and shot a bunch of footage, don't worry, there are ways to correct it in post production, however they can some times be tricky, and almost always more time consuming then setting your white balance from jump street.
So now that you know a little a bit about white balance, lets learn how to do it. There are two ways to set white balance on most modern DSLR cameras.
- Use the presets and auto white balance (AWB) built into the camera.
- Set a custom white balance.
Using the presets and auto white balance in the camera will vary slightly between camera models, but essentially, you want to find the white balance function in the camera menu, and set the white balance to an appropriate setting for the environment your shooting in; I.E. Sun light-use outdoors, Night- Duh!, Florescent-When you hear the annoying buzzing from tubes up above and so on. For more information, refer to your cameras owners' manual. The presets work pretty well, as well as the auto white balance, but some times, the lighting can be a little tricky where your shooting, and throw the presets off. That's the beauty of custom white balance.
To use a custom white balance, you'll want to get an 18% grey card. Why not a white card? White cards easily get marked and dirty and can throw off your white balance. I got this Grey card set at B&H for $22. It's easy to pack, and includes a white and black card along with the grey card. Place the Grey card so that it is under the lights you will be shooting your subjects in. Zoom in, or step closer so the center of your view finder is filled with the grey card; focus isn't an issue for this. Snap a picture.
To set the custom white balance on the Rebel T2i, go to the camera menu, and look for "Custome White Balance". Set the custom white balance to the picture you just took. Using it's super camera computer brain, it will use that picture as a reference to adjust for any unnatural color casting. If you are changing locations, or the lighting is changing significantly in the first location, you will have to reset the custom white balance to reflect the change. Don't for get to select custom white balance as your WB mode before shooting. Again for more details, refer to your camera's manual.
Using a grey card and the custom white balance function on my T2i has saved me a lot of time and trouble in post production. Doing it properly before shooting allows me to enter the post production process with clean, clear images, so if I want to add my own tinting or effects to the shot, I can start with a clean canvas.
You may find there are times when you like the tint caused by the light source, so you turn the white balance off. That's ok too, but you may want to shoot one with WB, and one without, that way you can make a final choice later on. Experiment, and see what works best for you.
If you found this article helpful, or at the least, entertaining, drop me a comment down below. As much as I love hearing myself talk/type, I write this blog for others to benefit from my learning process. I won't know which cotent is helpful, and which content is crap unless you let me know.
Subscribe to:
Posts (Atom)


