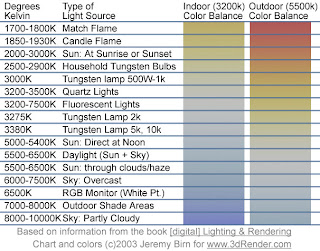
If you forget to set your white balance before shooting, you will most likely end up with images and video tinted different colors based on the light source present. You may have heard someone say "this clip looks a little hot". This could be due to someone not setting the white balance, and the clip came out with a redish tint. If you've forgotten to set white balance, and shot a bunch of footage, don't worry, there are ways to correct it in post production, however they can some times be tricky, and almost always more time consuming then setting your white balance from jump street.
So now that you know a little a bit about white balance, lets learn how to do it. There are two ways to set white balance on most modern DSLR cameras.
- Use the presets and auto white balance (AWB) built into the camera.
- Set a custom white balance.
Using the presets and auto white balance in the camera will vary slightly between camera models, but essentially, you want to find the white balance function in the camera menu, and set the white balance to an appropriate setting for the environment your shooting in; I.E. Sun light-use outdoors, Night- Duh!, Florescent-When you hear the annoying buzzing from tubes up above and so on. For more information, refer to your cameras owners' manual. The presets work pretty well, as well as the auto white balance, but some times, the lighting can be a little tricky where your shooting, and throw the presets off. That's the beauty of custom white balance.
To use a custom white balance, you'll want to get an 18% grey card. Why not a white card? White cards easily get marked and dirty and can throw off your white balance. I got this Grey card set at B&H for $22. It's easy to pack, and includes a white and black card along with the grey card. Place the Grey card so that it is under the lights you will be shooting your subjects in. Zoom in, or step closer so the center of your view finder is filled with the grey card; focus isn't an issue for this. Snap a picture.
To set the custom white balance on the Rebel T2i, go to the camera menu, and look for "Custome White Balance". Set the custom white balance to the picture you just took. Using it's super camera computer brain, it will use that picture as a reference to adjust for any unnatural color casting. If you are changing locations, or the lighting is changing significantly in the first location, you will have to reset the custom white balance to reflect the change. Don't for get to select custom white balance as your WB mode before shooting. Again for more details, refer to your camera's manual.
Using a grey card and the custom white balance function on my T2i has saved me a lot of time and trouble in post production. Doing it properly before shooting allows me to enter the post production process with clean, clear images, so if I want to add my own tinting or effects to the shot, I can start with a clean canvas.
You may find there are times when you like the tint caused by the light source, so you turn the white balance off. That's ok too, but you may want to shoot one with WB, and one without, that way you can make a final choice later on. Experiment, and see what works best for you.
If you found this article helpful, or at the least, entertaining, drop me a comment down below. As much as I love hearing myself talk/type, I write this blog for others to benefit from my learning process. I won't know which cotent is helpful, and which content is crap unless you let me know.


